One of the highlights of camping in the Cederberg is the magnificent night sky. Photographer Kyle Goetsch offers tips on photographing star trails and shares his favourite Cederberg locations for doing so.
There’s something special about the Cederberg, especially on a windless night. Staring up at the stars as the Milky Way rises over the rock formations that make it such a unique location … It’s as if time has stopped in places like these.
Being a landscape photographer based in Cape Town, I find myself heading to the Cederberg several times a year. That’s partly due to its close proximity to the Mother City (just a 2-3 hour drive away). Combine that with dark skies, unique rock formations and minimal light pollution, and an astrophotographer like me is in their element.
I’ve visited nearly all of the well-known and many of the not so well-known locations in the Cederberg. Many of these spots involve hiking a fair distance, but the effort is rewarded with stunning rock structures, San rock art, and a peace that comes from being alone in the wilderness.
Also read: Cederberg – the best kept secret of South Africa
One particular type of rock formation I’ve always found fascinating is naturally occurring rock arches. The Cederberg is one area where these are found in relative abundance. They can vary in size from a few metres to massive towering archways such as the Wolfberg Arch.
Over the years I’ve aspired to capturing star trails at each of the Cederberg’s arches. There are many unknown arches and others that aren’t accessible, but below I’ll share with you four of the more accessible arches that are well worth a visit. If you are interested in capturing star trails, read on for advice and insights, and find my favourite spots below.
Astrophotography: equipment & settings
You don’t need extremely expensive equipment to take photos of the night sky. Admittedly, more expensive gear will help you to get better quality images. But any basic DSLR or mirrorless camera can take a fairly decent image of the night sky. A wide angle lens is recommended for astrophotography. This will allow you to capture the Milky Way or a decent star trail. A tripod and remote trigger (not necessary if your camera can set a timer internally) are also essential items.
Essential equipment
- DSLR or mirrorless camera
- Wide angle lens (anything 24mm and wider eg.14-24mm or 15-35mm)
- Sturdy tripod
- Remote trigger (if camera cannot do it internally)
One of the things I love about astrophotography is the variety of techniques you can use to capture the night sky. You could take a simple image of the Milky Way core, or you could capture a panoramic image, or even a star trail or time-lapse of the Milky Way moving across the sky. There are so many options, and combining these with the unique rock structures of the Cederberg gives you a wide variety of compositions to choose from.
Recording star trails
There are two main methods for capturing star trails: the single image method and the multiple image method (intervalometer/interval timer method). Both have pros and cons, and there are certain times when one method is better than another for various reasons. All the images of star trails shown here are taken with the single image method. If you’d like to know more about the other methods, you can find astrophotography tutorials on my YouTube channel: @kyleincpt.
The biggest advantage of this method is that you are able to see a lot of the foreground detail without much noise (digital grain on the image). This is great for capturing the rock arches as you want to be able to see the textures and colours that form these unique structures.
It’s important to note that you need to be pointing south in order to capture the centre of the circle (southern polaris). You can use the Southern Cross to find due south or an app on your phone, such as PhotoPills or Planit.
Basic camera settings for a single image star trail
Shutter speed: 45 minutes (use a remote trigger if you can’t program this in camera)
Aperture: f5.6 (if you want more foreground detail use f4)
ISO: ISO 200
LENR: Long exposure noise reduction must be turned ON. This is important as your sensor creates hot pixels in your image (little red, blue or green dots). The long exposure noise reduction will remove these in camera for you. IMPORTANT: The LENR will take a frame of the same duration as your shutter speed. So if you take a 45-minute exposure for your star trail, you will have to wait another 45 minutes for the noise reduction to finish processing. DO NOT turn your camera off while this is happening, but you can put your lens cap on and put your camera in your bag.
Best time of year
You can capture stunning night images in the Cederberg year round during new moon. However, the best time for the Milky Way core is during the winter months, May through to September. Star trails can be captured year round. If you want clean star trails without the Milky Way core streaked across them, then the summer months are best.
The Cederberg’s arches
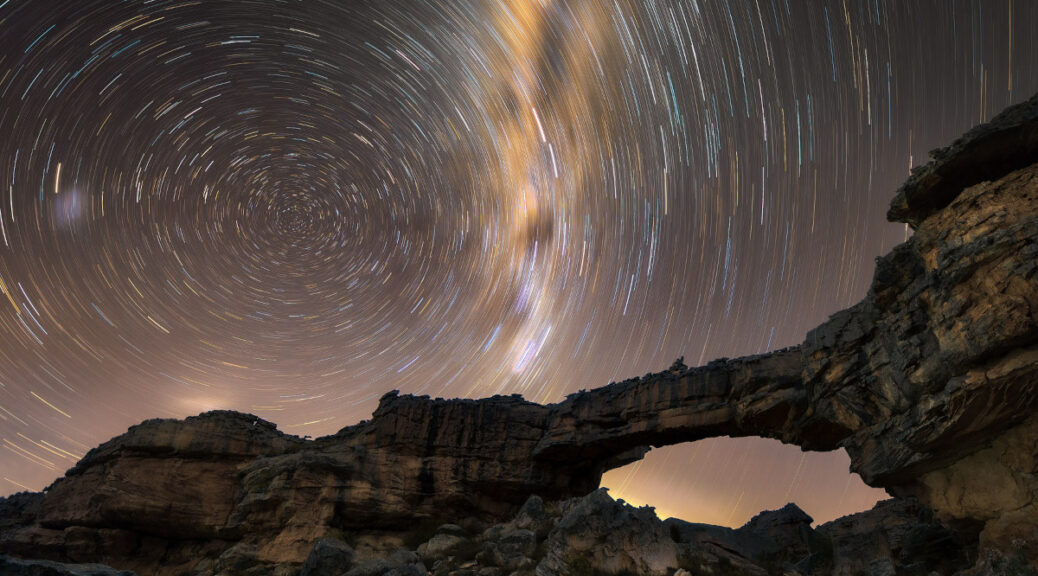
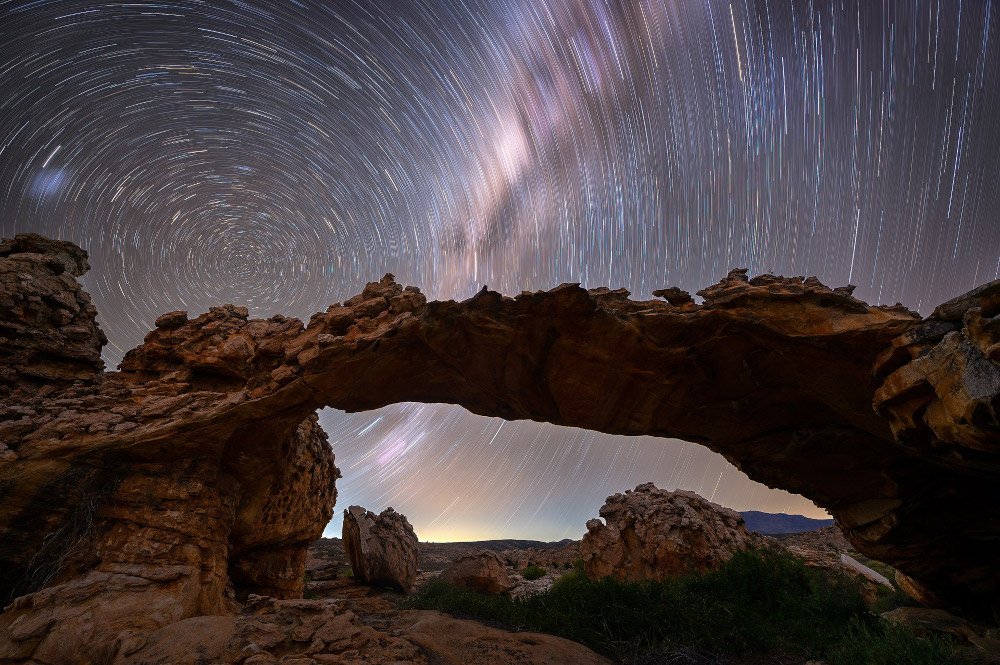
Wolfberg Arch
Probably the most well known of the Cederberg arches, Wolfberg Arch is also the biggest. You’ll need to do a bit of training for this one as it requires a 4-6 hour hike (7 km) up a steep zig-zagging trail to the arch, but it’s worth the effort.
I’d recommend spending a night at the arch as you can free camp right at the base. You’ll need to get an overnight hiking permit from CapeNature, as well as a hiking permit from Sanddrif Farm where the hike starts (because you’ll hike through their private land). Sanddrif has great campsites, so if you want to camp and just do a day hike up to the arch, this is also possible.
From personal experience, Wolfberg Arch can get very busy over weekends, which is not ideal for astrophotography. Someone will inevitably turn a light on and ruin your star trail image. I find the best time to go specifically for astrophotography is during weekdays and the colder winter months as there are fewer people hiking to the arch. The colder weather also means clearer skies and better night images.
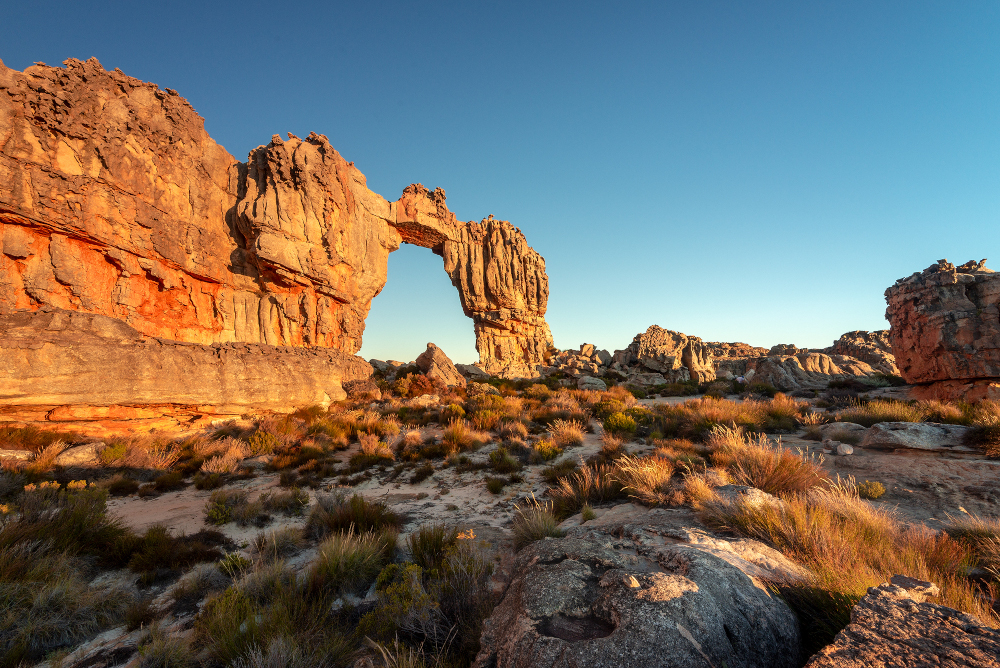
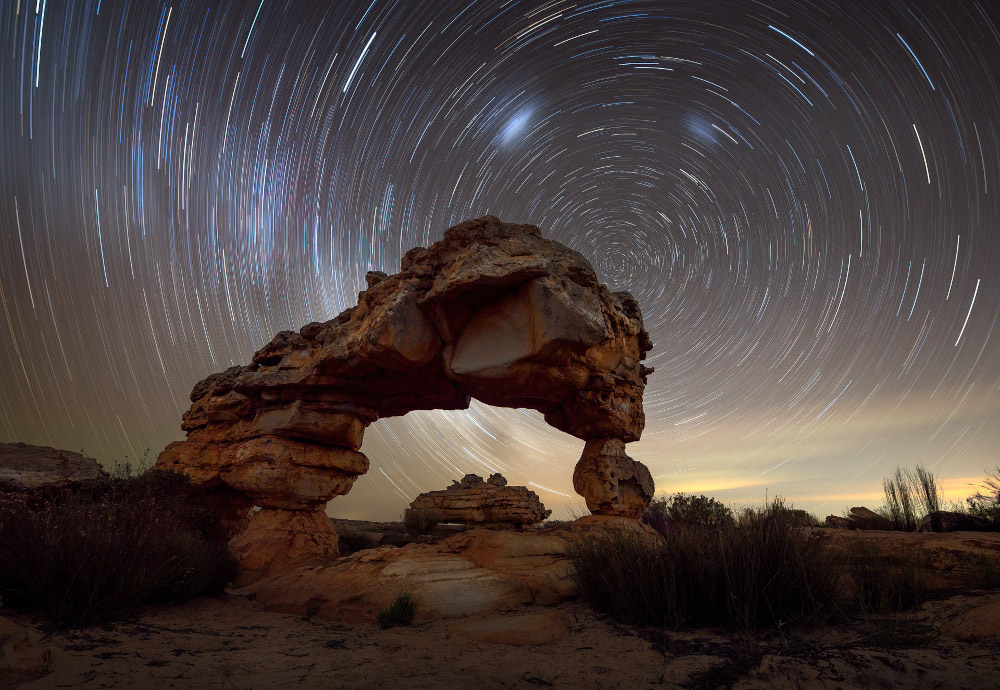
Sewing Machine Arch
Yes, this arch gets its name because it looks like an old sewing machine from a particular angle. This is the smallest of the four arches, but one of the most picturesque. It is found near Kagga Kamma Nature Reserve, which has chalets and camping facilities. You do not need a permit for this arch because it sits next to the road on the drive into Kagga Kamma. However, you do need to inform the reserve you’ll be going to the arch at night for astrophotography.
The Sewing Machine Arch is the most accessible arch in the Cederberg and one I’d recommend starting with if you’ve never attempted any astrophotography before. Take a chair and some coffee and watch the stars overhead as you capture a stunning star trail at this location.
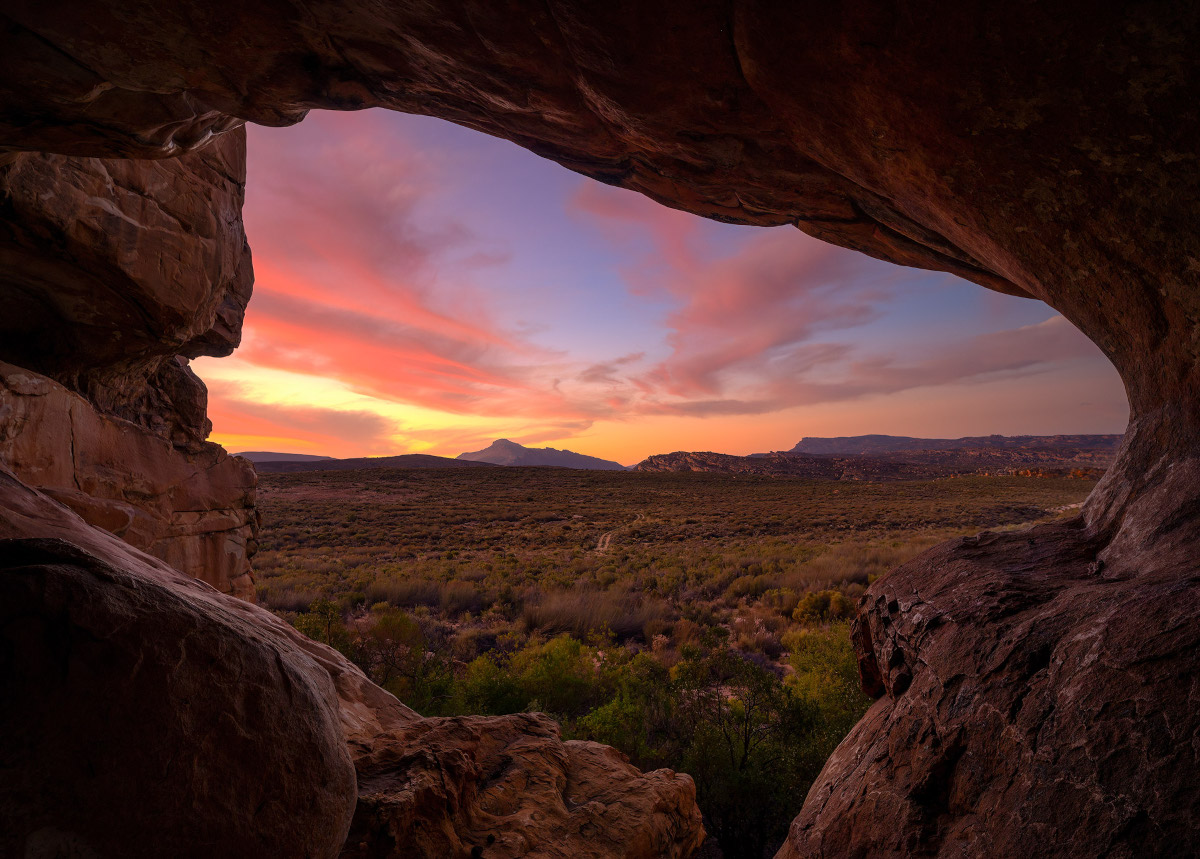
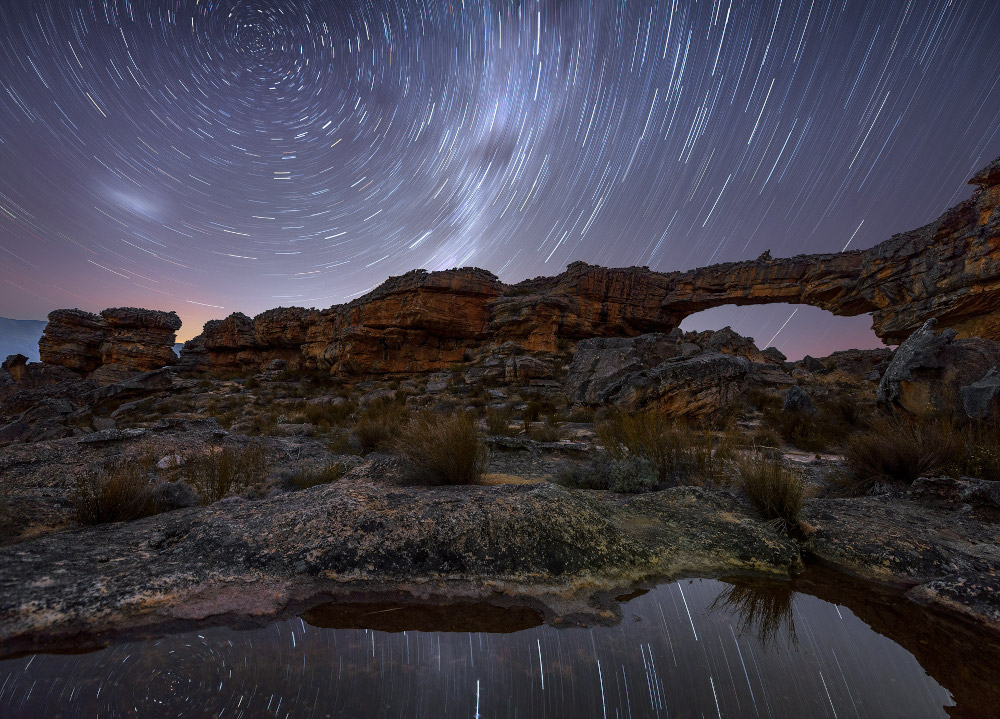
Highveld Arch
The Highveld Arch is one of my favourite arches to photograph as it can be captured from both directions and has stunning rock formations all around it. This arch is on private land and can only be accessed by staying at Houdenbek Farm. Here you’ll find a variety of accommodation options, from chalets to campsites. The arch’s location on a private farm is ideal for astrophotography as it limits the number of people that can access the site.
This arch also requires a long hike up a hill (6 km), but you’ll walk through amazing rock structures with San rock art along the way to break up the distance. I enjoy visiting Highveld Arch during the winter months as there is a good chance the rock pools near the arch will have water in them. These are ideal for reflection images of the stars.
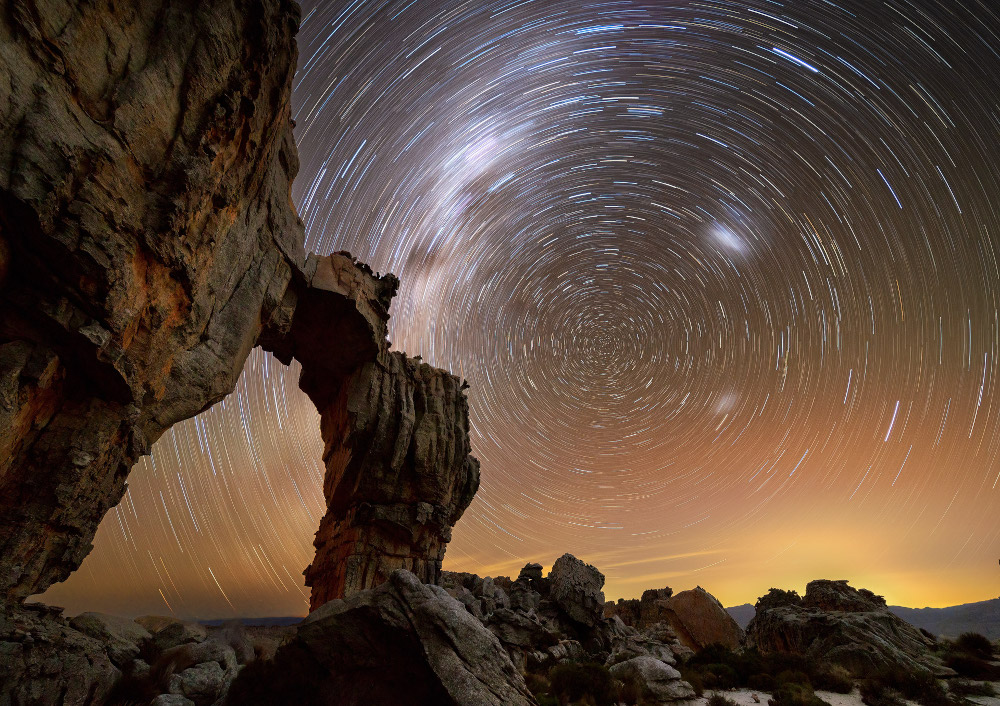
Unnamed arch
This particular arch has no name (none that I can find, at least), but is another favourite of mine to photograph. It is also located on private land and is accessible with a guide from Mount Ceder under their #secretcederberg activities. Mount Ceder offers self-catering and camping facilities, making it an ideal stopover through the Cederberg.
The guides know where the arch is located and will take you there in their 4×4 vehicle. There are other stunning rock formations in the area, so it’s worth going during the day to scout some new locations before you head out to capture the stars.
Also read: Best places to stay in the Cederberg
I hope this article has inspired you to get out to the Cederberg and capture some amazing night sky images. It really is a beautiful part of South Africa and a great place to spend some time hiking and exploring.
For more landscape images and astrophotography, follow @kyleincpt on Instagram or Facebook, or visit www.kylegoetsch.com for details of astrophotography workshops.
Over to you
Do you have a favourite spot in the Cederberg? Send your pictures to newsletter@tracks4africa.co.za for a chance to be featured in the Tracks4Africa newsletter.
